Thursday, December 29, 2005

Pace RC41

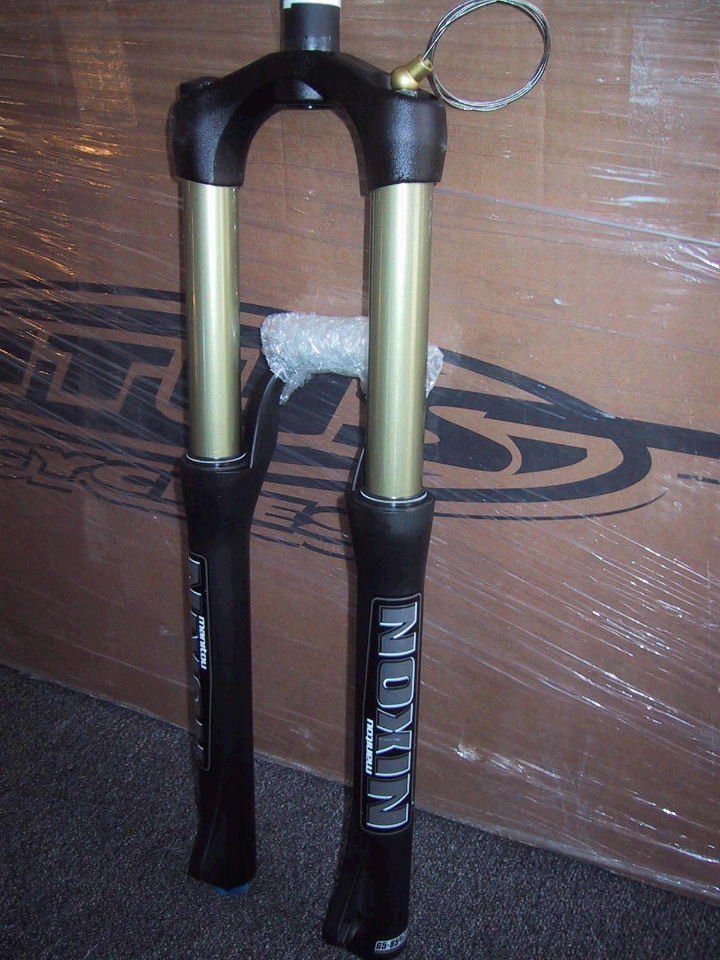
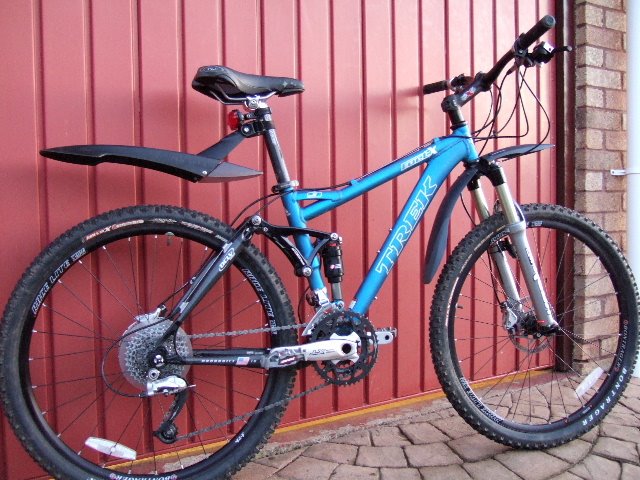
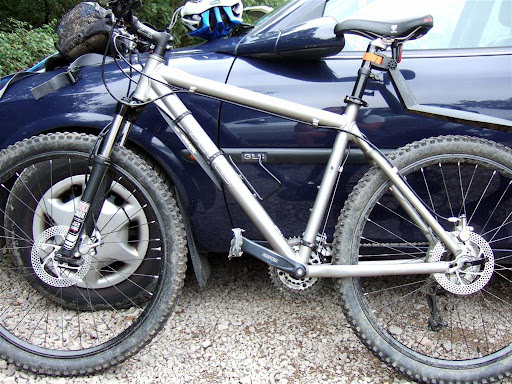
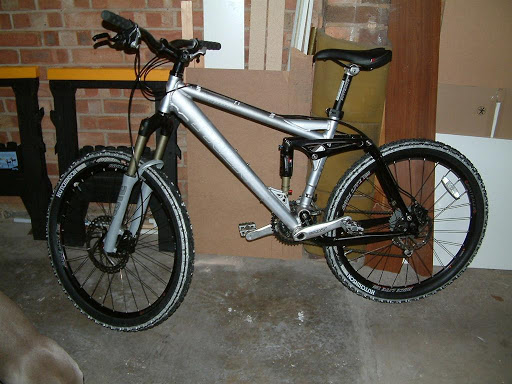
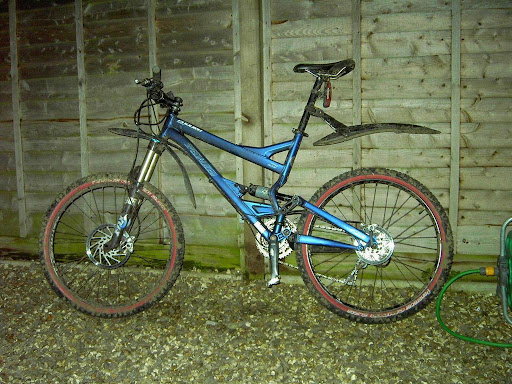
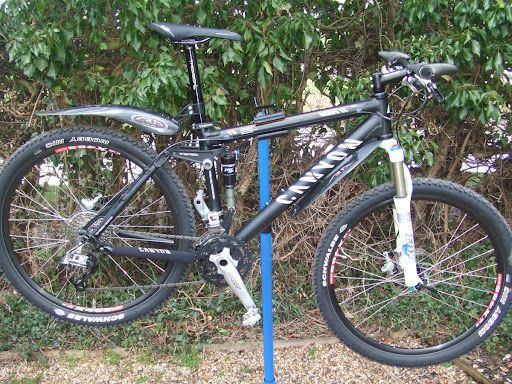
As my Nixon Super initially had a few teething problems, I decided to get my 5Spot a backup and alternative front bouncer, enter the Pace RC41. I selected this beauty as it's very light (3.5lbs), air sprung / flexible, has a climbing knock-down and looks very trick with it's exposed carbon weave. I also thought that it's 130mm of travel and ideal a-c for the 5Spot would be a good to comparison with the slightly longer Nixon. It'd potentially give me a more flexible steed for different rides and conditions, not that I was keen to keep swapping the forks around too often.

The only flaw in acquiring the Pace was that it's front brake used an IS (international standard) mount whereas the Nixon uses a Hayes/post style, which matched my front calliper. I therefore acquired a new Mono M4 caliper with the fork but then subsequently scored a complete front brake, 2nd hand from the Singletrack classifieds. The complete system made the process of swapping forks very quick and easy so the spare caliper was passed on.

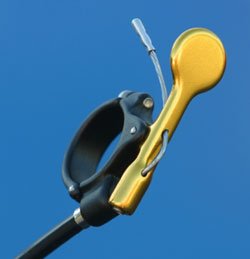
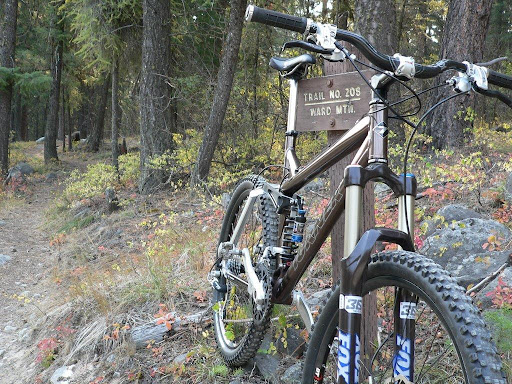
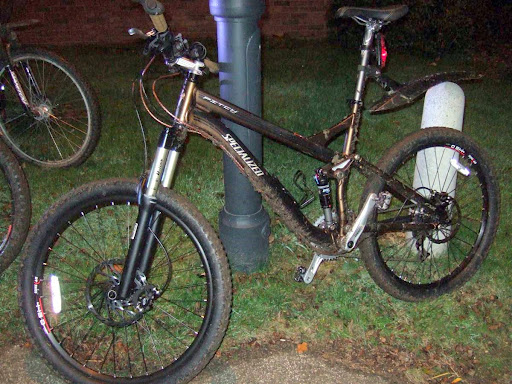
In use the RC41 is nicely adjustable with external compression and rebound, the latter of which is easily accessible whilst riding at the top of the right fork leg. Which also houses the knock-down climbing aid which reduces the front travel by approximately 2 inches. This can either be cancelled manually or by setting a blow-off threshold which'll automatically extend the fork on a big hit lest you forget on the way back down.

Possibly the most noticeable difference with this fork is just how light the front of the bike becomes and I found it very easy to loft the front wheel over obstacles.

Pace market the RC41 with a "linear air spring" which I'm mightily impressed with. During deep compressions the spring rate doesn't increase during it's travel like a spring or other air forks and it gives a lovely bottomless feel. The flipside is that it then requires a different technique to loft off ledges as you can't "load" the front as much beforehand. It's no bigee though as the overall performance is very good.

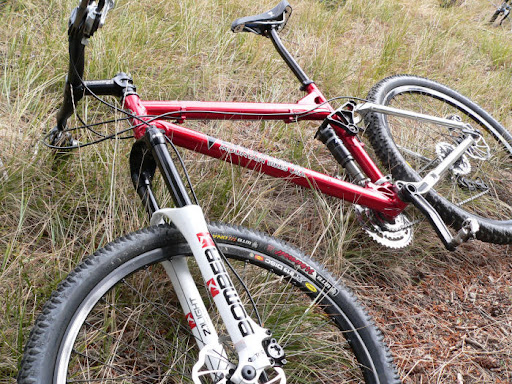
Steering stiffness is certainly on a par with the Nixon and it's slightly shorter travel means my 5Spot becomes a very, very nimble machine. It'll change direction in a heartbeat and makes tight, technical singletrack a delight once you've dialed in your lightning quick reactions. Ironically, the quick steering has made me realise that I prefer the slightly more laid back feel of the Nixon so unfortunately I'll be passed the Pace on. I'll be sad to see it go but rest assured that it'll be going to a good home...

Wednesday, December 28, 2005

Nixon Super

Why? Whilst investigating my 5Spot purchase, I wanted the bike to be as flexible as possible with a particular emphasis on nailing down the front on steep climbs. Many fork manufacturers offer climbing aids to lower the front a little but many of the early incarnations also caused the spring rate to ramp up, making the fork stiffer. Marzocchi were an obvious starting point with either ETA system but the axle to crown heights were too long for the frame (a-c lengths are lower for '06 and now inline with other manufacturer's). They were also a little heavy at close to 5lbs. Partly to keep the weight down, I wanted to try and air fork as the seals were now more durable and the bouncer would be more tune-able as a result. As I really liked the feel of my Manitou Black, I thought that their Nixon Super might be suitable as it uses the same buttery smooth TPC damping system. It also employs a new snazzy bar mounted, infinte travel (IT) adjust system which is theory meant I could run it shorter on climbs, near the 5Spot recommended 130mm on the level and open it right up on the descents. I opted to stay away from the toublesome Platinum model as the SPV and IT systems seemed to be causing many recall issues. An order was duly placed with Chad at RedBarnBicycles, who'd also been impressed with the same fork as fitted to his El'Salty. Chad also suggested that I opt for the lighter quick release version rather than using a bolt through front hub as he thought the 32mm diameter stanchions were plenty strong enough.

Adjustments. The compression, rebound and travel are all externally adjustable and make a marked difference to the ride, although some indents would be handy. All the adjusters are metal and hopefully more durable than the naff plastic items found elsewhere.

The IT system is so quick and easy to use with the fingertip adjuster next to the shifter on the handlebar. Depress the "spoon" and it'll gradually sinks through it's travel. Releasing, holds it at the selected length. This is handy on the steeper climbs and really helps to nail the front end down and virtually elimates the front wheel lifting and wandering. Lowering the travel does mean that you're more likely to whack a pedal on rocks, etc though, so I'd suggest using it sparingly. To extend the fork you depress the bar mounted "spoon" again and pop a little wheelie. It takes some practice to extend the fork on the move but it's easily achieved whilst you're stopped, gasping for air, at the top of the climb! The beauty of this travel adjust system is that the spring rate doesn't increase as you lower the fork, which means it's still supple / fluid over bumps and feels consistent.

Issues. When I initially bolted the fork onto the frame I noticed that I was only getting 1/3rd of the travel. Chad hadn't experienced this but contact the manufacturer on my behalf. Whilst I was waiting, the techy guy was out of the office at a show, I contacted the Raw (UK importer) who suggested that I send it directly to them for a fettle. They reviewed the problem and found the rebound assembly was busted and it also had misaligned lower legs. These were promptly replaced under warrantly and returned for just the cost of postage, a result. Back on the 5Spot it felt sweet and even while the fork bedding in I was impressed by how supple it felt over the smaller bumps and ripples. Over the next few months it got a pounding around Afan and Cannock without any further problems. In the autumn I wondered if I was inadvertantly catching the "spoon" with my thicker gloves on as I thought the fork was lower than I'd set during a couple of rides. So I moved the "spoon" inboard and continued on my ride. After hammering down a section of trail and at the bottom of the descent I lofted the front end over the log and found the front of the bike disappear over the other side, duly dumping me over the bars. Dozer found this particuarly funny as I'd only just commented on the "easy log hop"! I found the fork had mysteriously reduced to it's minimum travel (40mm) which was some 100mm/4"s shorter than expected... during the rest of the ride, the fork repeatedly sank through it's travel, unassisted. Another email to Raw suggested that I again return the fork as the travel adjust assembly had recently been modified and that they'd install a new unit. Whilst in for repair they also noticed some stanchion scoring (within the lowers) due to a tolerance issue - which necessitated a new set of uppers including the crown and steerer. Therefore, during both visits to Raw, my Nixon had not only been rebuilt twice but almost all the parts had now been replaced. It's subsequently back on my bike and we haven't had any problems so lets hope that all the niggles have now been resolved. We've not yet clocked up the longest runtime before the earlier problems occured, but we are getting closer...

Alongside the Nixon, I've periodically fitted the shorter Pace RC41 to my 5Spot which noticeably quickened the steering. However, I always find that I enjoy the slightly more laid back angles the Nixon gives.

Conclusion. Externally, the fork is well made, of a sturdy construction and not excessively heavy (4.1lbs) for the travel it offers (145mm). Internally, we've had a few negative experiences which I hope are now behind us with the modified components. In function, the positive air spring, compression and rebound adjusters alter the ride much as you'd expect. The TPC damping is as good as ever and really shines over the Marzocchi or Fox forks that I've tried. It also gives the Pace a run for it's money. The IT system is a handy feature to have, even though I've found that the 5Spot climbs well even with the fork extended.

Apart from Rockshox, I find the latest retail price of forks to be excessive and the price of the Nixon is no exception. However, if you can find any discounted I'd say that it'll be worth giving them a try.

I'd like to take this opportunity to thank Raw, who have been very helpful, professional and quick to turn around any faults.

For 2006, I notice that Manitou have revised their Nixon range and the Super is no longer available - boo. I suspect that this is due to their new "instrinsic" damping and compression cartridge (SPV evolve plus!) which may mean they've now optomised their Stable Platform Valve to also be supple over the small bumps. If they have then this could be a killer fork. I also hope that by simplifying the range, they'll reduce the number of recalls...

Tuesday, December 27, 2005

Fox RP3

The Fox Float RP3 is an evolution of the trusty ol'Float which both I and Chipmunk ran happily for three years without any problems on our trusty ol'Marin's. The RP3 came as part of my Turner 5Spot frameset and I was keen to compare just how the much technology was loaded into the new unit. The new bouncer not only packs more of a punch but it's lighter at around the 200g mark compared to the Float's 250g-ish. Both the old and new can's are air sprung with a useful range of rebound control as standard. However, the new contender has an additional pro-pedal lever (blue) mounted over the rebound adjuster (red). The 3 position lever subtly alters the ride by employing minimal, medium or high levels of pro-pedal. Neither have a lockout that would put pressure on your frame and linkages.

The accompanying Fox literature waffles on about cancelling rider induced bob whilst still remaining active whilst offroad. Although it took me a few rides to become accustomed to the handling of my new rig, when repeatedly riding over small roots the three settings do markedly alter the ride. Now that I've plenty more miles on the RP3, I find that it typically stays in the middle position for the majority of the terrain. I'll flip it to maximum on asphalt, especially climbs which tightens the handling and only drop it to the softer minimum setting on rough descents or over particularly rutted terrain. The control over traction it offers it quite amazing and it would have been very interesting to compare the RP3 in our ol'Marin Tara's - which housed the Float.

I've found it be a reliable, no fuss system that's handy to have during rides and it's also very easy to setup. Simply add psi to dial in sag and fine tuning from there over the next few rides to ensure that you're using all available travel whilst in the rough, while not bottoming out. There are no negative chambers to balance, bottom out, high or low speed adjusters to complicate setup and straight out out of the box it's performed perfectly. Period, home servicing of the air can is so easy, well worth doing to prevent problems and hasn't altered since the original. Regular regreasing on our ol'Floats saw it well passed 3,500 miles without even a new set of seals.

Once my RP3 falls out of warranty I'll be looking towards getting the unit Push'd, which should improve the ride further. If that's possible...

Saturday, December 24, 2005

Cube AMS Pro ?

At the moment Rob is sniffing around for a new fully and has recently found a review of a Cube AMS Pro in this months edition of MBUK. It's not directly available in the UK (boo) but that then makes it all the more exclusive! (you'd best brush up on your German if you follow the links)

It's geometry has an XC bias and 4" of travel front 'n' rear. The spec looks very respectable with Rockshox bouncers front and back, Avid Juicy 7's stoppers, SRAM gears, Fizik perch, Schwalbe boots and the rear also comes with the fabled Horst Link, ala pre '06 Turner's. It also uses 7005 alloy tubing which is light 'n' strong, the norm for MTB's is pretty much 6061. I believe that all this was available for £1,850, delivered - which seems a pretty good deal with all that hardware.

I'm not familiar with the brand or model but all reports are favourable; review. Perhaps someone else knows a little that they'd like to share...

Thursday, December 22, 2005

Les Gets'06

Jan'06 update : Trip Cancelled

Until the Westoning posse get around to posting a suitable Blog about a possible return to Les Gets, I figured we'd best get something online for peeps to get their teeth into.

Rob's proposing a weeks visit, begining 25th June'06. The latest head count had something like 5 or 6 definites, 6 maybe's and 4 cannot's/sobs. It seems that couples might be an option but much depends on the take up.

Checkout the photo's from the '05 trip. The four of 'em travelled by car (15hrs each way) and Dozer estimates the entire trip cost 'em around £500 each all in.

Info about the area can be found at the Les Gets website.

Ps : If the Westoning boys email me some pukka info then I'll update this Blog accordingly. There were also grand ideas about a write up from the '05 trip to wet our appetite and entice more of us out for '06, so stayed tuned folks...

Tuesday, December 20, 2005

E111 Expires...

Did you know that the E111 forms are not valid from the end of Dec?

You'll be needing a new card called the EHIC (European Health Insurance Card), which can be applied for online. Just thought I give y'all a heads up especially with the possibility of a MTBing trip to the contintent next year (Blog pending).

Studded Tyres Anyone ?

This morning I noticed that the Grand Union canal was starting to freeze over, which typically happens if it's been cold for a few days. If it stays cold for much longer then we'll soon be needing studs like this geezer.


Pretty cool. Thread over at; Mtbr.com - Ice Riding in a NY Swamp.

Friday, December 16, 2005

Singletrack - Help Save Chickshore

It appears that insurance woes mean that it is highly unlikely that the north shore trails over at "Chicky" will remain open and that they're to dozed shortly. Which'd be a shame 'cos I was hoping to get over there sometime in the New Year to see what it's all about, especially as it's <20 miles away. Checkout Singletrack - Help Save Chickshore for the full scoop.

Update 19th: Chicksands northshore trails have been saved, see Comments...

Winterised Cables

Avid Flak Jackets.

The posted delivered a parcel yesterday that'll hopefully contain a solution to my regular cable lubing that now seems to be needed almost every couple of rides. If it doesn't then uphilla with his "recommendation", is in a whole heap'o'trouble !

It's not that I mind a little maintenance, it's just that since the wetter weather arrived my rear der has been snickin' "ghost shifts" on most rides, typically when you need it least.

I guess the main contibutor is that I'm now riding through much gloopier terrain that I used to and all that extra mud and sh!te seems to find it's way into the cable, mainly the final rear der section.

Could it be that perhaps the 5Spot is more susceptible to this problem ? Or its the more direct, rear der cable run on my SRAM ? Which I doubt (tho it may contribute) as I my earlier Shimano rear cable "loop" used to clog up a little on my olMarin.

Oh and I'm also using a slightly larger diameter outer which seems to be allowing more cr@p in to glog the system. During a recent strip down, I found it hard to rethread the inner and after mucho pushing it started to going through the outer. A couple more shoves and it appeared at the other end but after a couple of inches had cleared it then flopped to the side ! It wasn't the inner cable at all, rather grit and mud that had compacted itself inside. Why am I using the larger diameter outer ? Hmmm, I read (somewhere) that it reduces friction as the inner will be free-er, which in turn should lessen ghost shifts. However, Rob came up with a good argument against it; in that the inner isn't as well supported and will cut thru the lining quicker, which'll then increase the friction. Aargh.

You can see from the pic that the Flak Jacket cable outers are fully sealed so any moisture or gloop is now gonna find it very tough to bury itself deep inside. One of the main features over my basic setup are those cable end caps which slim down sugly over the inners. Such a system is employed by top flight Shimano cables and used to good effect by the likes of Rob. The Flak Jackets take this a step further tho by then sliding an outer sheath over the normally exposed cable inners. Thus completing their sealed cable system.

I hope to be fitting these beauty's soon, over the wkend if possible, and I'll provide an update after a week or two's worth of muddy riding. Then we'll see if the theory works !

Monday, December 12, 2005

A Lefty on a Turner ?

Hehe, this is what happens when you fit proprietry kit to a non Cannondale; Mtbr.com Forums - Orange Crush. Ouch...

Sunday, December 11, 2005

Woburn Dec 11th

The MK posse had a quiet wkend with just a short jaunt around Woburn on Sunday.

The ground was still surprisingly slippy even tho it hasn't really rained for a few days. It caught Chipmunk out a little as the front end shimmied down the side of a root. The resulting "catch" meant that her calf took a thump which'll look dandy on Wednesday, peeking below her evening dress at the Woburn Xmas dinner ! I guess it might even be a talking point...

It was good to see that one of the gantry's has been replaced by a longer ladder to straddle the wide muddy gully. Once the ground had become waterlogged a few wks back, the previous shorter "bridge" had a soggy run up which resulted in a surprise, gloopy endo for yours truely. The tempoary logs straddling the entry were just as leathal so I'm pleased with the result as it helps to keep the northerly Danesborough section flowing.

PS: Please excuse the snaps as I only had my phone with me but the sunlight looked so gorgeous that I just had to try and capture it. Brumsters gallery also has a pic of Chipmunk racing off into the distance, but her Trek is so damn fast that I barely got chance to hit the button - so it's a little blurry.

Monday, December 05, 2005

Woburn Dec 5th

Posted on behalf of Rob, he had a lickle Blog trouble...bless him;

Had another little run out, only Farqui and me this time. Shame on all of you the mud was lovely!! Are there ever conditions that the sand is nice to ride in?

Thankfully the rain held off long enough and in the end it was a really good run.

Next Monday or Tuesday anyone? Babysitter required here, Dozer surely you'd rather sit with my kids?

~Oh and the non-native's route was rubbish, most of it didn't even exist. OS you need to resurvey the woods!! Rob

Trail Head; CMK, 7pm
Stats; 20 miles, 1,364ft ascending, 2hrs 05mins

Posse; Rob (Cannondale Jekyll) Lee (Turner 5Spot)

Injuries; None

Mechanicals; Rob's Cateye headlamp self destructed just as we got to the woods, he seemed to miss it too...

Weather; Although the ride itself was dry, it'd rained for an hour or so before hand which helped to provide an entertaining muddy mix of trails.

Friday, December 02, 2005

1st post as an honarary member

tap...tap...tap.

Is this thing on ?

Well, mr. Farq's it seems you've totally screwed up now. You gave the controls of this most excellent blog to an american.... and not just any bloody ol' american, one that's had entirely to much to drink. Well okay i've only actually had 4 or 5 or 6 beers, but heck who's counting ?

Anyway... i just thought i'd introduce myself and also let you all know that i've really enjoyed your stories and blog updates thus far....so please keep'em coming. Your ride updates have been awesome !

To those that don't know me....i run a small, okay...truth be known....a very small bike shop over here in the states called Red Barn Bicycles outta Hamilton Montana (yes there are grizzly's out in our wilderness) . We specialize in mtb's mostly (cuz that's were we got our own start), but we do cater to the road, recumbent, tandem, and bmxer's out there. The barn is damn near 100 years old, which is old when judged by american standards. My wifes grandfather, Alfred ran dairy cattle out of here since 56', and then came along this skinny biking feller and i have since turned it upside down and into a nice community bike shop since 2000. Allthough we still produce 60 tons of hay per year we're far more intrigued with gears, suspension, and things that turn circles. But .... enough about me....i can't wait to hear more about your ride and the journey that it takes you on. You fellas take care !

enjoy a picture from tonites winterland ?

Tuesday, November 29, 2005

Ebay - hard way to build a bike?

A few years back I went through a series of stock bikes that did not suit me and had come to the conclusion that;

a) I could not afford to buy anything decent from stock.
b) If I wanted a quality bike then I would have to build it myself

Keep in mind that, at this stage, I thought £500 was a fortune to spend on a bike.

It was then that I started tracking stuff on ebay and within a short time I had bought a brand new Saracen Tufftrax frame for £35 which was the starting point for my project. I had great fun over a number of weeks/months finding the rest of the bits, XT Cranks, Mavic 519 rims, Marzochi Forks etc. It was so satisfying to end up with a really well equipped hardtail and in summer 2003 I completed the Coast to Coast ride from St. Bees to Sunderland on it without problem.

Of course, it was about this time I started reading the bike mags and in retrospect can see how easy it is to be drawn into the dreaded UGI, (upgradeitus)!

What I really needed was a quality lightweight XC frame! Originally the Kinesis Maxlight frame looked good, but was perhaps an unknown quantity. So back to ebay for a browse - where I came across an almost brand new Specialized S-Works HT frame in the US. Not sure I engaged the brain too much at this stage, but as the sale finished in the early hours I set my alarm and logged on to bid and won! Was well pleased to have a top frame for around £350 (UK retail £799) and it was shipped to me quickly without any charges. Even so 10 times the price of my slightly heavier Saracen frame!

There was no stopping me now - A pair of Fox Float 80RLT's from California, XT Discs from Colorado and so on. After the initial caution of buying from the States it turned out to be a very positive experience, most of the sellers were riders like myself and eager to help. All but one item came through without charge, so the savings on UK/New prices were massive. I guess because the new prices of bike parts are lower, used parts can be really cheap compared to the UK. Hard to estimate the total cost because I used some parts of my previous bike - but probably around £1000. Saw a similar built bike in a dealer's window for 3 times that price! It may seem like hard work, but I enjoyed the experience, not sure I would do it again though and it seems that import charges are more likely now.

This has become my most used bike, I ride it most days and it fits me well and I love it! Riding does tend to be road, tracks and easier XC. There have been a few changes over the last year, the main one being to convert to 8 speed and fit a shorter stem.

Spec:
Specialized M5 S-works Hardtail frame 2004 Anodised Silver: Easton EA50 Bars
Kore 70mm Stem: Thompson Elite seatpost
SDG Belair saddle: XTR Crankset (8-Speed)
XTR Front Mech:. XTR Rear Mech
XT Changers : Mavic 317 Black Rims (Nov 2005)
Specialized Baldy Tyres(Nov 2005) : Shimano XT 4-pot discs
Fox Float 80RLT 2004 Forks.: V12 Flat Pedals

Sunday, November 27, 2005

Dalbeattie and New bike

Hello Dudes, the weekend ride didn’t go as well as expected. I had quite a few setup issues on the new bike (bike spec), also the forestry commission kindly cut the Dalbeattie course by 6miles, this was due to tree felling!!

I’ve been riding Shimano rapid rise for two years and that caused a bloody nightmare, couldn’t get my brain to switch, so I was changing up and instead of down, this really got on my nerves, also extremely frustrating.

The fox fork felt horrible; too bouncy, especially on drop off’s. The front would dive\dip horrendously, felt like I was going over the bars. I posted on bikemagic.com and got a couple of things to try (See thread).

I did notice that climbing over the rough stuff is easier (which I wasn’t expecting), also I could take rocky descents faster (Get in). Because this was the first time, I’d ridden a full sus bike, everything felt so unnatural, and I hated it for the first 5 miles!!!

Also because I've never ridden a full sus bike before, I've got no idea whether the rear suspension is working well or not. I did notice pedal bob whilst climbing and managed to get rid of that, by increasing the propedal. So more time in the saddle needed.

I had a strange feeling that the back wheel was dragging (dont think it's the brakes, because they're running fine), only felt this twice over 12 miles and it only lasted about two seconds?

Dalbeattie was good, a bit too much fire track, but the flowing single track and black sections were very good indeed. I’ve included photos of the slab at Dalbeattie; I’m the one in the blue top, blue helmet, half way down the slab. The chap in the red is my mate drew. Dalbeattie photos

By the way, my pictures don’t do it justice and it doesn’t look that steep, checkout this photo from a bikemagic post, it looks a lot steeper from the top.

Toons

Thursday, November 24, 2005

Master MTB Skills

Hello Dudes

I’ve been reading “master mountain bike skills” and its bloody brilliant, I’ve been m’bikng for 17 years and this book has taught me a great deal, also I reckon it’s improved me riding, mainly because you learn the theory of why you do certain things, its defo worth a look.


Overview

Also a review here.

Wednesday, November 23, 2005

FNC hits Woburn - Bedfordshire

Last night, the Westoning posse fancied a break from their regular, local FNC (Friday night club) rides so they tooled up and headed north west to the Magic Kingdom. The route is one of Farq's primary rides that starts with a twiddly route thru MK over to Aspley Heath. Then it's play time in and around the woods before gunning it back down the A5 and heading home.

Trail Head; CMK, 7.45pm
Stats; 21.7 miles, 1,443ft ascending, 2hrs 42mins

Posse; Darren (Cannondale) Dave (Specialized Endozer) Les (Spesh Rockhopper h/tail) Lee (Turner 5Spot) Rob (Cannondale Jekyll)

Injuries; nothing major although Les seemed keen to lie down wherever possible

Mechanicals; Les - rear mech woes, Lee - lost a cleat bolt

Weather; above freezing, dry, clear and windless...

Sunday, November 06, 2005

Cannock Chase - Staffordshire

The Northants posse broke cover and hit Cannock Chase for a pleasant guided ride taking in the Chase The Dog (CTD) trail. Little did we realise that the weather would be against us and suck the life out of our brakes from the off. This was one of those rides that makes you realise how much fun rides in good weather really are !

Trail Head; Milford, Barley Mo pub car park, 9am
Stats; 21.7 miles, 1,443ft ascending, 2hrs 42mins

Posse; Geoff (Turner 5Spot) David (Santa Cruz Chameleon h/tail) Lee (Turner 5Spot). A local guide failed to show up, so into the driving rain we rode...

Injuries; Geoff managed a full scale paratroopers roll less than 1 mile into the ride on a steep, rutted, baby head descent. With David and Lee doing well to ride around the flailing rider and bike as they parted company. Lee had a nasty tumble in one of the first sections of CTD, running wide he failed to clear a large stump and tumbled, hitting bonce on tree in the process. The lack of brakes also had him "shoulder" a tree later which then dumped him back onto the trail sideways.

Mechanicals; All three bike suffered zero pad life at the finish, x2 Hope Mono M4's and x1 Shimano 4-pot - all fried. Lee had the rear der cable snag on the seat post clamp a couple of times - that'll teach him for not running the cables thru the "taco".

Weather; Wet for the 1st half with a mix of light 'n' heavy drizzle. Kinda dried up (from the heavens at least) on the run back down to the cars. Wet weather clothing was indeed wet. Posted by Picasa

Tuesday, November 01, 2005

Bontrager ACX's

With the weather turning, mud starting to accumulate on the local trails and my 2.1 Panaracer XC Pro's rapidly running out of grip I turned my attention to some alternatives for the winter. As the Panaracer's had been much better than my earlier experience with WTB Motoraptors, I initially thought that a pair of the winter orientated Trailrakers would fit the bill. However, users reported a tendancy for them to be "sketchy" on asphalt which is no good on my local trails.

Whilst Chipmunk was enjoying a ride around Woburn on her new steed and I noticed that she was much more stable thru the pools of mud than I and that the Bontrager ACX's cleared the gloop from their treads muck quicker than my XC's. After taking a closer look at the tread, it's clear that there are fewer knobs which are also deeper that provide the extra traction. Better still, Chipmunk didn't report any adverse affects on hardpack or asphalt.

Looking at the specification, the ACX's were also available in a "tubeless ready" format (with a slightly heavier carcass) which'd be a good option for trying out the DT UST rim kits I'd just purchased. The 2.2 UST versions are light too and came in on a par with 2.1 XC's at 590 grams a piece. Better still they were typically cheaper than other manufacturer's non-UST tyres.

Fitting the blighters required a good wrestle around the garage and my fingers were sore for days afterwards ! However, once they were on they weren't going anywhere. It was just a shame that I'd chickened out and fitted tubes ! They're likely to be coming of again for the UST tests later, grrr.

In use, the 2.2 ACX's seem to roll well and are certainly no worse than 2.1 XC Pro's. On the loose stuff they're stable under drive, cornering or braking. I immediately noticed that they grip cross camber transverses with ease, which have always left the XC's hunting for grip and slipping to the low side. When the going gets really gloopy, they bite very well and don't clog the tyre or frame with cack either.

One area where they are "lively" is when you're coasting across muddy sections as they seem to like to wander around a little. However, as soon as you stomp on the pedals they dig in an fire you forward.

Monday, October 10, 2005

Importing

As most of you will be aware, I'm partial to importing MTB bits when the price is right. As many questions are often asked on forum's about importing goods, I thought I'd spread the word based on my experiences.

Why ?

If you're looking for exotica or hard to find goods within the UK then it's an obvious step to look elsewhere and the US market can offer substantial savings. Many of the products used on MTB's are developed by American company's, so acquiring these nearer to source saves money. German or British goods are often more expensive in the US so it's often best to look for goods on a national basis. The US market is also very competetive and retailers often have heavily discounted goods in order to attract customers.

Retailers

Both Chad at Red Barn Bicycles and Larry at Mountain High Cyclery are very competitive (knowledgeable too) and between them there's not much that they can't supply. Currently, their web presence is minimal but a quick email or phone call we soon see you straight.

Other generally cheap online options are; PricePoint, Nashbar, Performance Bicycle, Beyond Bikes, Green Fish Sports and Jenson. Most of these offer frequent discount or coupons, the latest of which can be acquired here.

Speedgoat are also worthy of a mention as their website contains comprehensive product info. Go-Ride is often worth a look. Wrenchscience and Competitive Cyclist also have good websites including "bike fit" calculators.

Importing

Is actually very easy and pretty exciting as you get to track your order as it roams the globe. There aren't any special tricks to learn or documents to complete but a few points should be noted.
  • Import duty and UK Vat are charged at 4.5% and 17.5% respectively if you're ordering components, or a bike in bits.
  • Duty increases to 15% if you import a ready build steed.
  • Duty and Vat are charged on the foreign cost of the goods, plus shipping before converting to GBP and calculating to import charges.
If you import from the US then I'd recommend using USPS which in turn will automatically employ Parcel Force within the UK. USPS Global Express allows you to track the consignments to UK customs where upon you'll acquire a PF tracking number. The goods are then usually held at a local depot for you to pay the outstanding charges. However, note that PF will charge you extra for their involvement.

My experience with Fedex was much less straight forward, which is ironic as they're a dedicated door-to-door option. You're able to track the consignment with a little more accuracy than with USPS, however my parcel was left at the airport will no warning of charges that needed to be settled before it's release. Fortunately, I caught this promptly online and chased 'em up throughout an entire day before the goods were eventually dispatched. I then also received an invoice for the outstanding payment 35 days later ! So don't use Fedex if you're in a hurry. Oh yeah, they also overcharged me !!!

Some peeps seem to have managed to escape import duties, although I haven't, which makes the goods really cheap compared to the UK MRP.

Saturday, October 01, 2005

Which Perch ? - Fizik Gobi

Finally, I've found a perch that appears to fit "my" butt better than all earlier incaranations.

Although I've only ridden with it for a dozen-ish rides it's already getting rave reviews, enter the Fizik Gobi. It's quite a pricey little number to buy at UK mrp (£75ish) but they occassionally pop up in the bike classifieds, for mucho less - which is where I sourced mine.

My earlier saddles incl'd a couple of cheap Specialized Body Geometry's and WTB's but none were truely comfortable over a couple of hours riding. With the advent of my new ride I took advice and opted for the WTB Shadow which was a minor improvement but still had me looking for excuses to get out of the saddle. However, it did highlight that it's particular shape was pin pointing a couple of spots on my sit bones which prompted me to investigate alternatives with a slightly different shape. The smooth contours and "hammock" style of the Gobi are now working wonders for me and the flexi wings apparently mould to your particular contours even more over time so my grin should increase as they sag !

The 270g Gobi weighs in a teeny heavier than the Shadow it replaced at 210g.

Verdict; Although cheap, gel filled saddles may look comfortable initially IMO you'd do much better experimenting with different shaped and sized perches and keep the gel to a minimum.

Nor does cheap imply comfortable... Posted by Picasa

Which Light ? - Light & Motion ARC

It's that time of year again when the darkness takes a hold over most of our day and we need to dig out those lights in order to keep riding. I did this a couple of months ago and found that my good ol'DIY bodge-it, halogen unit was even heavier than I remembered at around 5lbs. I've happily run this 20w puppy for at least two winters but msTurner looked shocked when I approached her with it, "okay, okay, I'll look for something else."

A few magazine reviews and hours of web browsing later presented me with a couple of options. Upgrade my SLA (sealed lead acid) battery to NiMH (nickle metal hydride) which'd be much lighter. Wait until LED's are more powerful and then go shopping. Purchase a lighter NiMH powered system, probably with halogen bulbs. Or take the plunge and opt for a bright HID (high intensity discharge) unit with a light L-Ion (Lithium Ion) battery. Much depended on the £'s but I also wanted a replacement that'd be a significant improvement over da bodge.

I contacted my trusty suppliers in the USA and Chad came back with favourable prices for JetLights and Larry with Light&Motion. Price hunting in the UK just turned up the old adage; "rip off Britain" but manufacturer's worth a mention are; Lumicycle and Rush. The US run MTBR website provided a very useful insight into most options available and I especially appreciated the light beam comparisons, the specification table is also handy.

Time was tickin' on and the L&M ARC was starting to look like a decent option for me. I also understood that Larry was making an order in the very near future so I took the plunge and request one be sent over the pond. Why'd I select it ? The HID bulb isn't off the shelf with the standard casing and uses their own reflector which gives an excellent long range spot yet stil with ample floodlight spread. The battery is tiny (rumoured to be made even smaller soon) yet has a runtime that will suffice for long evening jaunt's. If I do need to carry another then it's so light that I'll hardly notice it in my backpack. It's also been well reviewed, should provide ample light, is compact, charges fairly quickly, simple to use and light weight. Plus msTurner seemed to like ! Although the charger came with a US mains plug it uses a standard old school "kettle" style cable which was easily swapped for a UK equivalent. The L-Ion ARC weighs in at 1.2lbs, around 4lbs lighter than my trusty ol'DIY jobbie and is so much neater. It also only cost half UK retail at approx £220 (incl'g shipping/duty/VAT) compared to £450...

In use the system is very easy to setup and was mounted up with any problems. The bar clamp will fit both standard and oversize bars and the screw fitting clamps up to any tension you want - I usually have it a little on the loose side so that I can dip the beam and it's also less likely to get damaged in a crash. The L&M mount also incorporates a break away mount to help save the bulb in a crash and if you look deep in the box it also comes with a helment mount - which I've not tried yet. On the bike, just a single plug fitting is needed which looks secure and weather tight. The lamp has two settings; 13w (60w halogen equivalent) and 11w (40w equiv) which don't provide a great deal of difference to the light yet give another 30-45mins burn time.

On my first few rides the harsh, white light emitted from the HID seemed odd compared to the softer, yellow halogen lamp. However, the brightness is most definitely the biggest improvement and has to be seen to be believed. Some don't like the spot of L&M but I thinks it's great for those high speed Millenium Falcon speed runs thru the woods. It helps you to spot that log or low branch long before it comes as a BIG surprise ! As my night rides are typically less than 2.5hrs I've had no problems with the battery running down and tend to leave it on for the duration, even during stops. HID lamps have a relatively short life which is greatly reduced by switching on/off repeatedly, plus then take a few sec's to warm up after each off.

Can it be improved ? Overall, I'd say that it's a crackin' little system that allows you to ride into the darkness almost as fast as during daylight. It might just have one possible short coming as I'd actually like to see a reduced low power setting so that it'd be more useful on the road. At the moment I tend to swing the lamp down and into the verge. Having said that, the relatively high settings are great for getting lazy drivers to dip their main beam if you swing your ARC across their bonnet !

Saturday, September 24, 2005

Ridgeway "Enduro"

At some point, prob'ly during a drunken haze, Lee and Shaun dreamt up the notion that riding the Ridgeway would be a grand goal for 2005. A close look at the route suggested that it would be "do-able" in a day provided that a swift pace was maintained. After all, the tracks are long established, mostly vehicle sized tracks and not nearly as knarly as those we'd earlier ridden in Wales. So it couldn't be that tough ?


The day started before dawn and Sue had kindly volunteered to shadow us in a chase vehicle throughout the day. Fortunately, the weather had been relatively dry for a few wks before hand which boded well for the first half of the ride which is mainly off road. Some forum biker's mentioned that these 40miles alone had taken 10hrs to complete the previous October ! They also indicated that to ride the entire trail in day is best done in the hieght of summer and even then it takes a mamoth effort, gulp. We hit the trail at around 8.30am and were greeted with a sky full of approx 20 hot air balloons which highlights the favourable conditions that morning. The first 10miles or so were fairly slow going as the track is deeply rutted by 4x4's which meant a full pedal stroke had to be carefully timed. We managed to pick up the pace a little for the next 25miles-ish with a mixture of short asphalt blasts and hard packed clay or gravel surfaces. We had a brief snack break at Whitehorse Hill and by our lunch stop in East Illsley at Crown & Horns both riders were defo in need of a break with Shaun's aching back (h/tail didn't soften the often lumpy trail) and Lee fighting off leg cramps.

Revived after some fab nosh both riders stomped back up the hill with revived legs to pick up the trail and thoroughly enjoyed the mostly downhill run to Goring on the Thames for a mandatory photo stop at the halfway point. Rather than taking 10hrs we'd managed to complete this in around 4hrs with the favourable trail conditions.

The next 20miles were cranked out on mainly asphalt back roads with the accumulated distance taking it's toll on Lee the MTBer, whereas Shaun the roadie was just getting into his stride. We ducked off the trail at Britwell Salome and found Sue curled up and pushing the z's which finally broke Lee's spirit, not helped by a recent off after misjudging a gate, so he ducked out after clocking 60miles.

Shaun was underterred (the hero) and after swapping his knobblies for slicks and slapping on his lights off he sped to hammer out the final 20miles or so. Without the MTBer in tow and now on road tyres Shaun managed to increase the average MPH and eventually arrived home, just past the official end to the ridgeway at Ivinghoe Beacon, an hour or so after dark.

Afterwards, hot baths and a few glugs of a suitably alcoholic beverage helped to ease the aching bones.


Trail Head
; Ridgeway start - s/w Avebury, 8am
Stats, Shaun; 88.5 miles, 5,754ft ascending, 11hrs 45mins
Lee; 59.7miles, 3,771ft ascending, 6hrs 46mins

Posse; Shaun (Giant XTC h/tail) Lee (Turner 5Spot)

Injuries; Fairly uneventful although at the end of Lee's stint, misjudging a transition he wiped out.

Mechanicals; Zip, not even a puncture. Hurrah.

Weather; Clear sky but slightly crisp all day.

Friday, September 23, 2005

Hopton Woods - Shropshire


Spent a couple of days over at Hopton Woods at the weekend while David practiced and took part in a Downhill race there.

Hopton is a compact site mostly about the downhill course, but there are some waymarked trails and nice, if short, singletrack. It is worth getting a map before you go - contact Pearce Cycles in Ludlow who were involved with developing the trails here. Or here. Rule seems to be use the greens and ambers to work your way up and then down the reds.

The Downhill course is rideable on an XC bike - it was interesting to see all abilities on the course, some taking 'big air' and others taking the 'chicken' lines. There is probably not enough here to keep you busy for the day. However, you are not far from the Mortimer Forest and Bringwood areas, (Near Ludlow), which offer loads more riding, though local knowledge is helpful here. There are also bridleways running away from Hopton which could make an extended ride. Ludlow is also a fab place for the family to visit with loads of shops, cafes, the castle and so on. One of my favourite parts of the country.

This weekend arrived about 2 days after my 5 Spot frame arrived in the Uk and I was still putting the final touches to it on the saturday morning. It performed brilliantly over the two days, only problem I found was the seatpost chosen had too much layback and so the front wheel tended to lift on sharp climbs - since changed this and the stem and this tendancy has gone.

David felt he did well in the race, but was exhausted by all the practice runs - despite having the luxury of an uplift - he certainly looked impressive over the jumps!

More Pictures

Saturday, September 10, 2005

Thule Bike Rack #9403

On our old coupe I had a roof mount bike rack which was fine as the car was low so I didn't have to raise the bikes too high. You could also still get into the boot but the bikes were exposed to the elements and not thoroughly secured. Since acquiring the jeep we initially used bike bags which kept the car clean and the bikes protected inside the vehicle so we felt like we could go for a bite to eat. The downsides were the repeated dis-assemby, re-assembly numerous times on a single trip and the fact that the rear seats had to flipped down. The bikes were also piled on top of one another which risked bending brake disc rotors and rear der hangers.

Now that the jeep has a towbar fitted we thought that we'd try a tow bar mounted bike rack which is low and easy to load/unload. It keeps the bikes out of the airstream and doesn't damage the mpg as much as a roof mounted rack. You can also keep a eye on your pride and joy as the bikes are visible in the rear view mirror, unlike a roof mounted rack. It's also easier to secure the bikes, keeps the inside of the car clean and we can still use the rear seats / boot.

At first I was a little sceptical how a tow bar mounted rack would work but in use the bikes are well secured and don't flop around at all. Another bonus is that fitting / removal is fast and easy with just a single bolt / lock. We've currently only mounted two bikes, nose to tail and we find that the saddles need to be slid out of the way to prevent chaffing with the bars / levers. I suspenct that mounting three bikes of a similar size would be a challenge.

As you can see from the pic, we opted for a Thule model which can carry upto three bikes and also came complete with all the electrics. Model = Ride On 9403. The two vertical supports work well to support the mainframes whilst the wheels are secured to the base. These supports are well padded and lie flat when not in use and make hanging it on the garage wall a doddle. Our model also had the ability to tilt back, in theory still providing access to the boot. Perhaps it's just our vehicle, but the angle of tilt is insufficient to lift the tailgate more than a couple of inches if you have a bike mounted on the "inside".

Overall, I'm mighty impressed with this option for transporting bikes especially as it was cheaper (approx £100) than a despoke roof rack and a couple of bikes racks for our coupe (£130).

Thursday, September 01, 2005

TF Tuning report

Dan goes Push'd
Intrepid reporter tries out a Fox Float R with TF Tuned Shox PUSH technology

After trying out Farq's Turner around Cannock Chase, I thought it was about time I tried to retro-fit some sort of pro-pedal damping to my Marin Rock Springs. The suggestion from Mr.F was to take a look at TF Tuned Shox near Bath, so I promptly ripped the Fox Float R out of the Marin, booked it in, packaged it up and sent it off.

The service from TFT involves them fitting what they call their PUSH technology into your existing shock housing. Provided it's in sound basic shape, they fully rebuild the unit with new seals and bushes and give it a thorough checking over (and fit the PUSH bits, of course, which I'm assuming are just some clever valving components).

The service is tailored to you - your riding style, your weight, your bike - all entered on a form which you post off with your shock. They turn it around in double-quick time and I was amazed to find it back in my hands mid-day Wednesday (after a Monday posting). It was back in the frame even quicker :)

First impressions were that it just felt like someone had put way too much pressure in it, and it was just very firm. Without any serious trails, I resorted to testing in the back garden. I reset the shock's cock ring and gently rode around, riding 'properly'. The bike felt firmer and more in control at the rear, but not uncomfortably so, hinting that the shock was doing it's work effectively - a check on the cock ring showed there was indeed plenty of travel, but it simply wasn't registering on my bum. So that's good then, I thought.

The "PUSH" effect (reduction of rider inputs) was harder to test and is more down to rider feedback. I tried some wally riding (standing up on the pedals and hammering away like a nutball) and naturally there was no chance of the shock ironing all that out; but it did feel better. The test, however, is rather pointless because I never ride like that anyway.

I did a gentle ride over flat ground versus a hard pedalling ride (staying in seat and riding properly) and there seemed very little difference in the travel used up on the shock, which would seem to be a rather unscientific way of proving that the PUSH damping was working. If not, the heavy effort would have shown more travel on the shock. Hey, I'm no John Whyte but that's the best I can come up with.

The PUSH upgrade itself costs £45 and most of the time the guys will only undertake the work as part of a full service (£75) - this I had done at the same time anyway, so the total bill came to £120. It seems a little steep but the PUSH-aspect itself is worth the money. If your shock is in perfect condition, the service wouldn't be necessary ofcourse.

All in all, money well spent if you have a bike with a non-PPD shock. Who needs Horst linkages (clearly Turner don't!). TFT's service is impeccable, quality of work is excellent and turn-around most impressive. Go on; push the boat out ....

Monday, August 15, 2005

Hope Mono M4's

With the purchase of my new steed I looked around at all the hydraulic disc brakes available and at the time the Mono M4's were one of the top options. Not only did early reports indicate that they worked well but they also had some nice engineering features such as different sized pistons to aid modulation. They also look the dogs...

I'd spent three happy years with Hope C2's and they never gave me any trouble. However, brake techonology had evolved since then and I also wanted to try a larger diameter disk in exchange for more power for less effort. On some of the longer decents in Wales, I found that the C2's could give me Popeye like forearm "pump" as I squeezed the hell out of 'em.

The M4's were duly purchase and fitted to my 5Spot which was a fair hassle as the IS mounts mean that aligning the calliper against the disc requires re-shimming a whole bunch of washers. I also hoped that the first few rides would free up the odd lazy piston but in the end I had to remove the pads, hold 3 pistons back and pump the lever to free 'em up. Repeat until all pistons move equally(ish).

I eventually chose 180mm rotor's front and rear which seems more than adequate to haul up my mass. However, I would be interested to see if a smaller 160mm rear disc would be a better match as I have to be slightly more careful with the rear brake. It's not a problem as you soon get used to it, but then I do like to ponder and tinker...

Ensuring that the disc tab's are straight 'n' true is highly recommended as any misalignment seems to result in noisy, squealin' brakes.

The levers fit snuggly next to my SRAM shifters and have a reasonable feel, not grabby and nor are they vague.

The complete brakeset (front & rear) incl'g the 180mm rotors, etc weighs in at around 2.1lbs. Which compares favourably with C2's that had smaller 160mm disc's fitted to my ol'Marin, coming in at 2.7lbs all in.

After being thoroughly bedded in on our local trails, we headed over to Afan for some proper testing. I found that full stop braking was easily achieved with single digits and that I was now riding much smoother as I had such a powerful reserve of speed shedding ability. I was also pleased to find that my forearm's weren't aching anymore.

More miles were put on the brakes and they've performed reliably, in both the wet or the dry. They did have a few weeks where they squealed throughout entire rides but I've since put this down to pad contamination, possibly after using car wash 'n' wax. This was soon cured after blasting the pads and disc's with Isopropyl Alcohol, as found in Maplins for cleaning circuit boards. They occassionally howl after standing for a day a two but they soon scrub up and shut up after a couple of stops.

By the end of the summer, I'd managed to put something like 900 miles on them with the original pads still having around 3/4's left. However, one wet, 18 mile around Cannock Chase soon saw the pads disintigrate and braking was limited throughout which has been the only hiccup in thier performance. I wasn't alone tho, 'cos by the end of the ride our pal uphilla (with his Shimano XT 4-pots) were also down to their backing plates.

If I have one gripe it has to be that the pads don't retract into the callipers very well which causes a little brake rub every now and again. Provided the discs/pads are cleaned with Isopropyl then I haven't found squeal to be a regularly annoying problem like many reviewers sugguest.

After the wet ride around Cannock, I've had a pair of Galfer pads in the rear which appear to be quieter, have the same feel / bite and don't seem to wear as quickly as some would suggest. Although our "alpine" stlye Bedfordshire trails aren't that demanding...

Overall, I must say that I'm impressed with their performance and if the long term niggle of dragging pads could be resolved then they'd get 10/10.

Monday, August 01, 2005

New Bike: Trek FuelEX 9 WSD

Posted on behalf of Chipmunk...


Having ridden a Marin Rock Springs for three years and never really feeling 100% confident or comfortable(!) we decided that it was time to look around for a replacement. It's also reasurring to see that manufacturer's are now gradually expanding their range of women specific rides. A rough short list had us looking for; Trek FuelEX9 WSD, Scott Genius Contessa, Specialized FSR XC (& Comp) Womens.

It took a while to locate any local bike shops that stocked women's bikes let alone those that we willing to let us have a test ride. Eventually our perseverence paid off tho as Pitsford Cycles had a medium/16" Trek FuelEX9 WSD demo available. A number of laps around the lake later and mucho fiddling with the settings by Farqui (can't he leave anything alone!) and we'd found a machine that felt much more stable, was easier to pedal (with less bob), lighter and much more comfortable. The Rockshox Poploc system on both the front and rear shock really rewards all your pedalling efforts in the locked out position and even Farqui had trouble keeping up on a blast over the damn. Whilst there, we found that another lady had just test ridden a Specialized FSR XC Women's and even tho they'd just put down a deposit she was kind enough to let me have a spin around the car park. Compared to the FuelEX it didn't feel as immediately comfortable but it did have a crackin' saddle! - a lady's BG2.

We managed to kick tyres and whiz around the car park on a Scott Genius Contessa over at Rutland Cycling but as it was their display model we weren't allowed to venture around the lake. A few more calls and the most helpful Buckingham Bikes were able to source a medium Contessa for a weekend demo. A return trip to Pitsford allowed us to compare the FuelEX against the Contessa over the same terrain and overall I'd have to report that the Scott felt more nimble, racy and had the most un-female friendly saddle on the planet ! The 3 position, adjustable rear shock was good and made a marked difference to the ride.

A couple more return visits to Pitsford comfirmed that the medium FuelEX was top of the shopping list, especially after trying the smaller 14" which felt much too cramped. Shopping around we found that Cycle Surgery were offering us the best deal and although supply was thin (with new stock on the horizon at this time of year) they were confident that they'd be able to source one. A few weeks later and Rob graciously collected my new ride which was in fine health apart from a sick rear wheel, which was temporarily replaced with a nasty, heavy Specialised unit Trek could source a replacement a week or so later. The first few rides around our familiar local trails were very encouraging and so much easier than my old bike.

A few weeks on and I felt that cockpit was perhaps a little cramped. As the original stem was only 70mm we sourced a 120mm replacement which calmed down the steering nicely. After a couple more rides, I still thought that the cockpit could be made a little longer so the 5mm layback seatpost was swapped out for a 20mm. The next ride was around the unfamiliar territory of Sherwood Pines and I immediately felt much more relaxed and almost 100% more confident, if that's possible. That such subtle adjustments can alter the ride so much is quite amazing. Reading the latest magazine review of a women's FuelEX it appears that this is not an uncommon complaint which is comforting that we already understood the issue.

The only other adjustment has been to fit a Specialized BG2 women's saddle like the one I briefly tried on the FSR XC. The original Bontrgager saddle was exchanged at the point of sale for a Specialized Dolce which looked comfortable but still left me with hot spots.

So I'm now the very proud owner of a bike that I find hard to fault. It's pimped out with carbon loveliness, top flight Shimano bits, reliable Rockshox suspension and I've found that I even like the Shimano integrated, flippy shifter thingies - which drives Farqui nuts when he's trying to setup the gears, hehe.

Monday, July 25, 2005

WSSR - Afan Forest, s.Wales

Meet the posse who ventured into south Wales for the Welsh Summer Solstice Ride at Afan park. A thoroughly scary bunch of bikers to ride with !

Two days fantastic riding were in order (for some) with a full contingent on The Wall and Penhydd trails on Saturday. I'll excuse Dan's later arrival and still cuss BrayDrude's unfortunate x3 punctures followed by a busted QR ! The stones were against you today Drude.

Sunday saw an enthusiastic Ben with Roger and Farqui tagging along to keep him company further up the valley to ride the July trail.

A bunch a pic's can be found here along with routes.

The accomodation is also worthy of a mention as Brumster managed to book us a couple of corkin' cabins that although remote were actually within a stones throw of an Afan trail.

Posse (left to right); Ben (Specialised h/tail) Tim (no-name h/tail) Farqui (Turner 5Spot) Nat (an "Aldi" style susser) BrayDrude (Giant XTC h/tail) Salty (Marin East Peak) Brumster (Marin Rock Springs) and Roger (his brand spankin new Specialised FSR XC Comp - with a big thanx to Rob).

Injuries; I can't recall any major incidents, tho I'm sure a few off's were experienced by most.

Mechanicals; BrayDrude's numerous punctures (later id'd as a duff batch & too small!) and his broken rear QR as he attempted a quick 3rd blown tube in succession without even turning a wheel. Oh and Brumster had some natty tubes which blew up like shotgun fire on the car park trackpump.

Weather; Glorious and dry with Sunday proving to be a scorcher for those who chose to kick back and relax at the equally fabulous cabins. Posted by Picasa

Thursday, July 14, 2005

GPS software - Tracklogs

The more observant amongst you will have spotted that some of my ride reports/Blogs have a corresponding map attached, created using Tracklogs. PC based piece of software that allows you to create new routes during those idle, wet, long dark winter evenings when you dream of some tasty singletrack to attack in the better weather. You can then upload these 'routes' into your GPS unit which'll dutifully guide you along your chosen trail from the convenience of your bars without the constant need to stop and unroll that gradually disintigrating map you just bought. Not only that, one your legs are tired, your grin is large, your bike looks like a chocolate brownie and the route is complete, it'll have stored all your route data (speed, distance, altitudes, etc) ready for reviewing back on your PC !

Most of the major GPS software packages are listed below and as their websites lists all their features I won't bore you with the technicalities, but I will highlight what found were their main points;
  • Anquet Is very similar to Tracklogs but I found the PC route making process fiddly and complicated as you need to create 'legs' first that are then combined to make a 'route'. However, with hindsight this is kinda useful as common sections of your local trails can be created once and then easily re-used when you create a slightly different overall route. Overall, I didn't find the s/ware intuitive or easy to use.
  • MemoryMap Is used by most of the biking/walking magazines but when I was looking they didn't have a demo version available. However, it does offer all the features available in the other packages. Perhaps someone can chime in and give us the gen...
  • Tracklogs Was the most intuitive s/ware I demo'd that allows routes to be quickly created. It also has a bunch of features that I thought were useful, more detail below. The pricing structure also appealed more than Anquet. It's now also becoming more widely used on tinterweb - Rob's now also using it ;-)
  • GPSU - Freeware, basic software that doesn't come bundled with maps - these are downloaded separately from a number of possible sources which makes the installation and configuration more cumbersome than the 'pay' packages above. One bonus of this s/ware is that it is able to convert routes between different file formats, so if you located a route on the web that's Anquet based then GPSU can convert it to say Tracklogs and use or modify it yourself.
All the packages now have demo versions available allowing you to evaluate the software for yourself. Though note that certains functionality may not be available...

Maps : All the 'pay' packages listed above have different pricing structures for their mapping converage and it's important to get a handle on this prior to purchasing. It's also worth pointing out that maps are available in differnt scales and OS types to better match your needs. Personally, I've had no problems with 1.50k scale maps and have the whole of the UK covered for a reasonable cost. Rob however has taken a different approach and uses the more detailed 1.25k maps and just buys an area at a time. To cover the whole of the UK this way would be very costly indeed.

Routes : Online routes can be downloaded from the software website above or try these; MountainBikeRides, MTBRoutes, NorthernRoutes (which is the most comprehensive I've found to date), RouteSource, etc.

Tracklogs : Why did I select this particular software ?
  • Routes : It's very easy to create routes/tracks by adding more track points or waypoints, all of which can be easily modified or removed later. Routes can easily be annotated to include key navigation comments which are then available on the 'route card', see below. You may also choose to add icons to your map that highlight common trail obstacles such as styles, gates, pubs, hazards which help to make the map useful to those not familiar with the trail.
  • Evelation Profile : Once a route is starting to come together you can start to see an elevation profile of the route which helps highlight the gradients involved. This may also show your speeds overlaid against the underlying evelation data. I've just started to explore adding additional information to routes such as the trail type i.e. grass, gravel, asphalt, tow-path, etc (all customisable) which can then show up as different colours on the profile - further helping you plan your ideal route.
  • Maps : Are all scalable so that you can review a route in it's entirity by zooming out or even quickly centring the map around your route. You may also zoom in on a particular section for more detail. All the information typically associated with a 1.50k OS map is available, including the legend.
  • Duration, etc : Tracklogs allows you to show speed, distance, elevation, etc data either as recorded from your GPS hardware. Alternatively, you can choose from a number of configurable alternatives within the Naismith Model that easily allow you to show duration times when Walking, MTBing, Road Riding or even Fell Running !
  • Route Card : Is a very handy feature ths is available in all routes that can break it into different sections, complete with distances and addtiional notes. These may then be printed on the reverse of your printed map thereby highlighting any difficult navigational areas that the map alone can't show. Your route properties can also be printed which might include a start time, location and any other details you feel are pruduent.
  • Printing : Your route can be printed out using the excellent print wizard which is great for selecting (and previewing) the map scale or positioning, etc. Printing also allows for the 'route card' information to be printed on the reverse along with handy route details such as the trail start time, location if a group of you are meeting somewhere unusual. Maps may also be printed without route data overlaid, again to a chosen scale.
  • Hardware : The interface to my Garmin eTrex didn't initially require any manual configuration or fiddlin' and was automatically located. The Tracklogs 'transfer' dialogue makes it simple to download and upload routes from all those stored within the GPS unit. I haven't had any issues with compatibilty although one shortfall of the basic eTrex is that it can only handle 124 waypoints per route which means that longer routes are truncated. Tracklogs can even handle this and allows you to break your long route up into shorter routes and stores them separately on your GPS unit. I opted for one of the cheapest unit's Garmin produce (it was on offer) as I figured it'd be less of worry if it broke. Bespoke GPS units also tend to be durable and built for a few knocks whilst outside. PDA & GPS combo's offer more functionality but are more delicate and expensive to replace. Although my unit only cost around £50 it needed a PC interface cable and I also figured that a handlebar mount good, the sum of which almost doubled the price.
  • Support : The intial version I installed just happended to coincide with a major new release of the software which contained a few installation problems. All my queries were answered quickly by the developers and over the months I've been using it I've seen regular updates to the software. So this isn't a package that you'll install, get frustrated with, get no response from the developers and wish you'd never purchased.
Some might consider that GPS isn't necessary for MTBing and I'd agree with them up to a point. I've found the device is a great way to keep the ride flowing, particularly along unfamiliar trails and it's also much more accurate than a simple trip computer in recording your speeds, distances, times, etc. If you're riding a loop and become lost then the unit will provide basic directions back to your start point, which has proved useful on occassion! However, as all but the most expensive GPS units don't yet show any basemap detail, then you really should carry a map of the area along with you, even if it's simply printed out from your GPS software.

If you don't own any GPS hardware then I'd highly recommend it but do beware that you'll also end up splashing out on the PC mapping software to help make the most of it. Otherwise it's simply a glorified trip meter !

Wednesday, June 15, 2005

Time Pedals

After flopping around on MTB's for a couple of years I eventually got fed up with my feet slipping off the pedals and the loose pedal then impailing itself hard into my shin. A solution needed to be found and magazines/internet mentioned these damn fangled SPD (Shimano Pedal Dynamics) systems.

Upon further investigation it appears that the pedals and shoes have a mechanism that clamp the two together which are released again with a twist of the ankle. Now that might sound a little odd but yonks ago, I'd ridden road bikes (damn it, the secret's out!) when toe clips were common place. If you tightened 'em up they were quite frankly lethal, but at least you typically managed to stay upright on the smooth road surfaces where you also have plenty of forward vision for planning ahead. Off road is another story as the uneven ground is hazardous and you often don't have too long to plan a relaxed, calm dismount when you're whizzing along twisty singletrack.

After studying the options available it became clear that virtually all SPD shoes are compatible with all SPD pedals as the relevant cleat is simply bolted to the underside using a standard bolt pattern. It seems that some shoes can be awkward to use with some pedals, especially if they have deep, rugged soles.

As the hunt for shoes only required a good fit to the foot, I focused on hunting down information on which pedals were available and it pretty much boiled down to two choices;
  • Shimano : Who had a miriad of pedal options from teeny race clips to big flat platforms, similar to those I'd been using but with the shoe retention system. Across the range they all seemed to have a tensioning system which means that whilst learning a low clamping force is applied for easy release. Once you're more familiar with dismounting with SPD's then you can increase the tension which also means that you'll be able to pedal with more conviction and not unclip unintentionally. The flip side to the tension adjust meant that cleat (the bit which fixes to the sole of your shoe) alignment was essentail as the mechanism doesn't provide much if any float and knee problems could result if poorly aligned. The Shimano pedals also had numerous moving parts with close tolerances which must work really well on the road but on muddy surfaces users reported that it was often difficult to clip back in once you'd walked around in the gloop.
  • Time : Who had a limited choice of pedals and no tension adjusters, which kept the pedals looking neat and simple. Without any adjustment they instead opted for a double sided cleat with one side requiring a lesser 13 degrees ankle twist to unclip and the other a more retentive 17 degrees. Their design also allows a few degrees of float which apparently helped to save the knees from a poorly adjusted, rigid clamping mechanism. The simple nature of the design means that tolerances aren't as tight and that they are much more mud friendly when compared to Shimano.
I decided to opt for Time's as I value my knees (afterall, I ride and don't run!) and I also figured that their robust simplicity would be better suited to offroad use. So which model should I choose ? I figured that something fairly basic would be a good start just in case I decided this SPD thang wasn't my cuppa, so I chose the ATAC (Auto Tension Adjustment Concept) Aliums. They aren't very light (at 1lb a pair) but they looked a fair balance of price and function. In use I initially found them easy to clip into (just dip your toe and press) but a devil to snap out of ! A few weeks of accumulating bruises gradually saw a technique emerge along with a crutial ability for the brain to automatically unclip when needed. Although I came close at one point, I did manage to stay out of the canal !

Over the years they've proven to be very reliable with my original set now having covered well over 4k miles without the need for a service. The bearings are still sweet and much to my amazement I haven't even needed to change the cleats which is fantastic as they're now used every week day on my commuter. I've been so happy with them that I even acquired a second set which have shrugged off many a pedal on rock strike. They also work brilliantly off road and you can happily walk through muddy sections and then just stamp the pedals when re-mounting and you're clipped in. No fuss.

More recently, CrankBros have introduced a range of SPD pedals which uses a mechanism very similiar to Time with the exception that they are typically lighter and smaller. The cleats are also very similar and allow riders to swap rides without having to swap pedals. Shimano cleats aren't interchangeable with either of these systems but I believe they are with Shimano-esque versions from say the likes of Ritchey, etc.

There are other SPD's available, which I'm sure other riders are happy with but the Time ATAC Aliums have been a solid performer for me. I've no regrets and I'd happily recommend them to others.

Update: With Chipmunk now seeking to use SPD's and my happy time with Time's (ahem) we've opted for the platform pedal called the Time Z. It provides a larger area to plant your foot if you don't want to clip in and are also sufficiently comfortable to use without cleats/bike shows so are ideal for the 5 minute jaunt down to the pub wearing trainers. However, whilst learning we intend to use some cheapo Shimano pedals with the adjustable tension as I found that Time's (although excellent) do require a great deal of commitment and a fair amount of strength to use initially - until they bed in and you get familiar with the technique.

Tuesday, June 14, 2005

SRAM vs Shimano

After recently making the transition from the "mainstream" Shimano gear shifts to SRAM I thought that I'd "spread the word" and give you the benefit of my experience.

I'm sure that almost everybody will be familiar with the Shimano amd it's MTB groupset with it's various levels of "competence" from the functional yet basic Deore, LX, XT up to the flag ship XTR. But how many of you know about SRAM ?

Background : Until a recently they were a small company building on it's slightly different take to the Shimano "standard" gear changes with different shifters, cassettes, chains. However, they're recently undergone few years of rapid expansion and are "the" company on a roll and are surely out to rival the bigS. They're moving towards being able to supply their own groupset after acquiring the likes of Avid (brakes) and Truvativ (cranks/stems/bars/seatposts/etc). More recently, they also bought out RockShox (forks, shox's) which is fairly big coo and give's them an edge to Shimano as they don't manufacture forks.

The SRAM gear sets range from X7, X9 to the major bling X0.

A number of basic differences separate SRAM from Shimano in the operation of gear changes.

  1. SRAM operate on a 1:1 ratio between the shifters and the mechs, whereas Shimano use 2:1 on the rear and 1:1 on the front. This means that a SRAM system is likely to operate for longer without the need for small adjustments and to be less prone to ghost shifts on full suspension steeds.
  2. SRAM shifter paddles are operated by the thumb only whereas Shimano require both the thumb and forefinger. This was a major selling point for me as having 4 fingers permenantly wrapped around the bars gives a more secure ride over those large boulders. It's also much less strain on the grey cells as only the thumb is in motion.
  3. The rear mech cable routing on SRAM is direct from the chainstay whereas Shimano need a long loop of cable to enter in the rear. The most obvious advantage of a direct cable run is less drag but an additional benefit is that shrubbery is less likely to get hooked along for a ride !
  4. SRAM rear mechs use a much firmer spring mechanism over Shimano. Which greatly reduces chain slap (chain hitting the chainstay), chain derailment when jumping and the mech hitting the chainstay. I can also be a pain to then get the back wheel out ! Update: checkout this thread for a video (approx 28Mb) that helps to highlight the differences.
SRAM also produce a Shimano range of compatible shifters called (rather uninspiringly) "2:1 shifters" ! Fortunately, they're more commonly referred to as Rocket or Attack.

Having previously used Shimano Deore and the midrange LX I can confirm that it's all good kit and works very well, with noticable improvements higher up the range. Converting to the SRAM midrange X9 shifters didn't cause any worries and in operation the changes are slightly less slick but feel more positive. Which I find a bonus when you've a set of full fingers gloves on as I always mis-shifted Shimano gears during the winter as their operation is quite light to the touch. Do they change any differently ? Probably but I'll be damned if I can tell. You'd need a dedicated test rig to figure that out and personally I'd prefer just to get out and ride...

Appart from the shifter ratio's all other components are interchangeable between the manufacturer's and my current rig has SRAM X9 shifters, rear mech and chain with a Shimano cassette and front mech. I've found that SRAM chain's tend to last longer but that probably means that the rest of drivetrain wears a little more rapdily.

The general understanding is that the SRAM front mech isn't as slick as Shimano, all Shimano cranks/bb's set the industry standard for light/stiff, that the top flight SRAM X0 rear mech is the bees-knees, that the SRAM X0 shifters are leagues ahead and that the rest of the kit functions on a par.

You chose which you'd like...